Mikrotik de 5 doors?
Once a Mikrotik (for example, a 750GL model) it's a real router 5 ports and not just an ordinary home-use router (what, actually, it's a router with a switch 4 doors), you can configure it to run multiple networks, use multiple providers for WAN network failover and more. Why you would want to do any of these things is beyond the scope of this post., but we will show you how to do it.
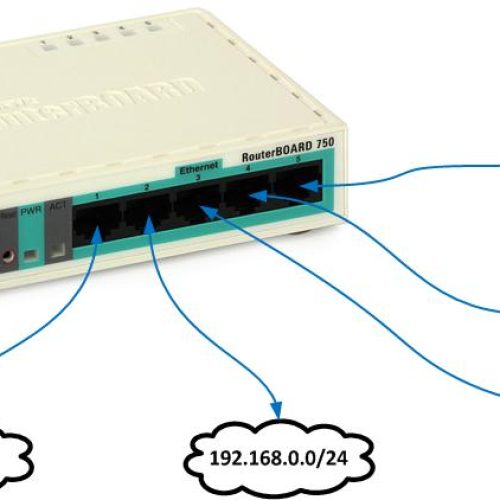
Let's take an RB750GL and make it run 4 internal networks instead of just one. it will be like this:

Porta Master
by default, O 750 is configured so that ether1 is the WAN port and ether2, ether3, ether4 and ether5 are the LAN ports. The reason why these 4 ports work together is because ether2 has all LAN settings and DHCP server, and then the ether3, 4 e 5 are all “slaves” da ether2. In terms of Mikrotik, a ether3, 4 e 5 have their porta Master configured for ether2. The doors are even “nominated” like this, and there is a “S” in the left column showing which ports are “slaves”:

If we want ether3-5 to run separate networks, we need to configure them so they don't have a porta master. It is important to note that the “Name” of the interface will not change based on the settings. If you change ether3 from slave to master, the name no will be updated automatically. it's just a name. you could call her “Porta 3” or “Fred” or “Here I connected my NAS”. This does not affect the functionality of the router.… Don't get confused by port names when you start making changes.
Change Master port on ether3, 4 e 5 like this (and change the interface name, if you wish):

When you configured ether3-5 to not have a Master port, none of the ports should show a “S” in the left column.

Now, for a port to run its own network, she needs some things:
- IP adress
- DHCP server
- Rota
IP addresses
To assign each port its own IP address, patch me up IP e, then, in Addresses. Click on the sign +, enter the IP address you want to assign to the port, type the network you want to associate with the port and select the port from the drop-down menu Interface. To configure the 192.168.3.xyz subnet on ether3, would be like this:

When all 4 subnets are configured, the screen of mailing list should look like this (ether3, 4 e 5 are in italics because nothing is connected to them):

DHCP Servers and IP Pools
Then, configure a DHCP server for each port. It's the same concept as changing the default DHCP range, but you are just adding additional DHCP Servers and IP Pools to be used on your network.
First, configure the additional IP Pools you will use for each server. It's better to do this first, for what, when configuring the new DHCP server, you can simply select the new IP Pool from the dropdown menu, instead of having to close it, go back and create the new Pool and, then, go back to create the new DHCP server.
Go in IP / Pool and click on +. Name the Pool (for example, pool1 seems to subnet .1, pool2 for the subnet .2 or any name you find easy to remember). Then, insert the Adresses to the DHCP range you want to use for that port – for example, to the subnet .3, you might want something like 192.168.3.50-192.168.3.100.

Do this for each port and screen on your Pool it should look like this (I set up a pool for a VPN too, and the default dhcp pool was already set and I didn't want to change it just for these screenshots):

At this point, these IP Pools are not being used by anything. You need to configure new DHCP servers to use them.
Go in IP / DHCP Server / DHCP and click on +. Name the new server, set the Interface to the port you want this server to use and define the Address Pool you want this server to use. In other words…

Do this for each port and screen on your DHCP server it should look like this:

To follow, you must configure your Redes DHCP, so that each DHCP Client receives the correct information, like what are your Gateway and DNS servers. For example:

After doing this for 3 new DHCP servers (not counting what was already configured on ether2), and body to DHCP Server / Networks it should stay like this:

At this point, if you connect your laptop to ether3, it will get an IP address in the range 192.168.3.xyz. If you disconnect it and connect it to ether5, it will get an IP address in the range 192.168.5.xyz.
routes
the last step, which is not actually a 'step', but what you need to know, it's about the Routes configured for these new networks that you created. See this screenshot.

I have NOT configured any of these routes manually. O “D” in the left column means that each Route was dynamically added. When you configure IP Addresses for each port, as soon as you add a new address, the router automatically creates a dynamically created Route to that network. In this simple scenario, you just need to be aware of it, you don't have to do anything with it. Note that the screenshot shows “inaccessible” on ports that have nothing connected to them.
Now you have it 4 LAN networks running on your Mikrotik. Since they are all on different subnets, you will not get any traffic “broadcast” between them. However, you can access one subnet from another by accessing a specific IP. For example, with Control4, when you open the programming software, it detects a broadcast sent by the Control4 processor. If you are on a different subnet, will not see it and the processor will not appear in the software. However, you can manually add processor ip address and it will work properly, even if it's on a different subnet. (This is not a how-to suggestion., just an example). The same goes for things like Airplay and other streaming protocols.. Many of them rely on broadcasts to let everyone know they are available and waiting to receive a music stream.. This can get tricky when you start targeting different parts of your networks..