Having a pen boot drive is a great help for those who need to install Windows on a netbook, or in other situations not to use the DVD and for those who simply feel more comfortable using the pen drive.
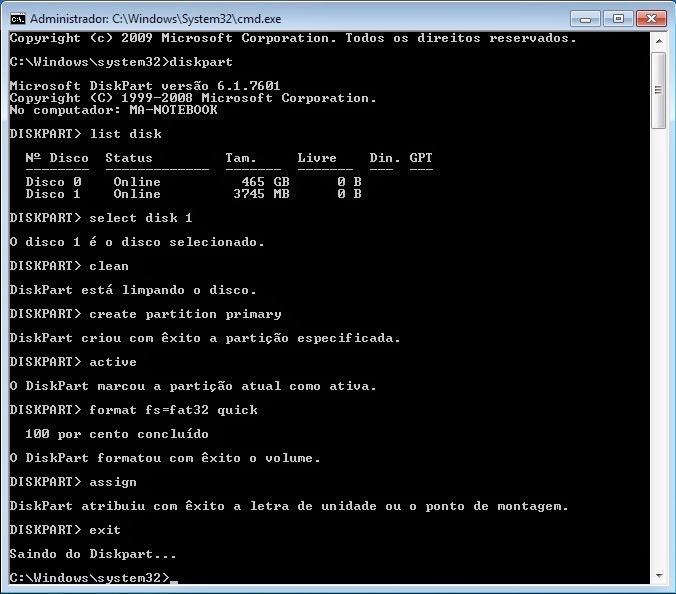
1th step: Click Start and search for “cmd“, click the executable “cmd” Right-click and click “Execute as administrator“.

2th step: Enter the following commands, always pressing Enter after each.
- Diskpart
- List Disk
- Select Disk 1 (replace the 1 the number for your pendrive)
- Clean
- Create partition primary
- Active
- Format fs=fat32 quick
- Assign
- Exit
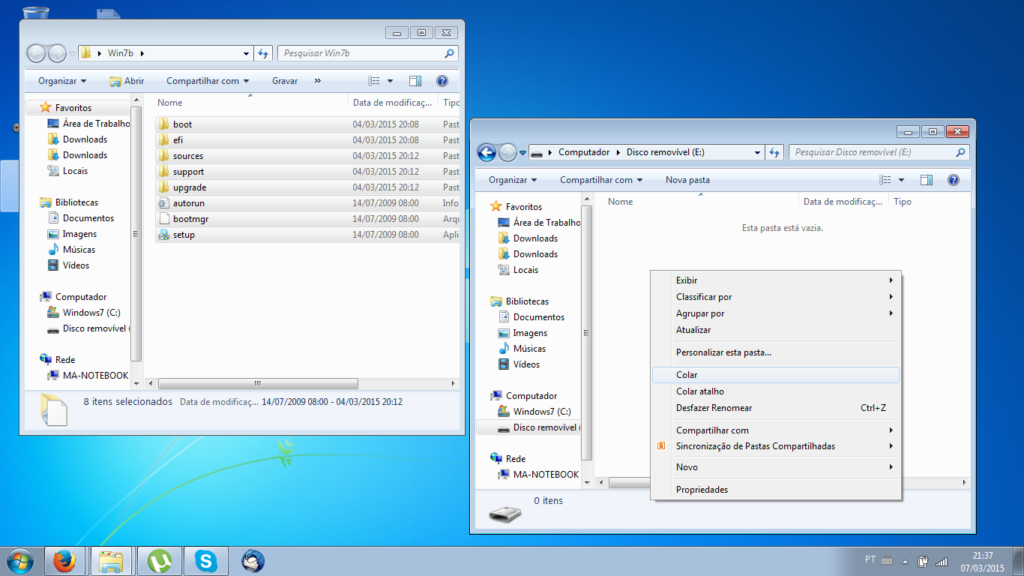
3th step: Copy all the files from the DVD to the USB drive. In case the image below I already had the files on the computer, so I'm copying the folder to the USB drive.
Soon! After copied the files to the flash drive is just plug in the computer that you want to install the system, configurar no setup o boot por USB e deixar o pen drive iniciar.
Update: also see step by step in the video below.
Source: www.purainfo.com.br


16 Comments
The simplest I saw, It works!!
thanks for the tutorial will help a lot.. dps give feedback here
Or follow step by step, but when it ends and open the USB stick has nothing recorded………..help me, please
Good afternoon,
You copied, manually, DVR files to USB stick?
Very good !!!
I always used this method (which by the way I learned here) for Windows installation, but I'm an Ubuntu version to install and I'm not getting. Can anyone tell me if I need to do something different?
Good Morning,
Yes, to install Ubuntu is different, see as step by step the link below.
How to create a bootable pen drive Ubuntu 14.04: https://www.interside.org/2016/04/como-criar-um-pendrive-bootavel-do.html
Good Morning.. It works with Linux?
Good Morning,
No, to create a bootable flash drive from a Linux system is a little different. You can see the tutorial here: https://www.interside.org/2016/04/como-criar-um-pendrive-bootavel-do.html
I loved! I did and it worked! Now I would like to make a stick with option to install Windows 7 or Windows 8. It is to do this without program?
Good afternoon,
is yes, you will need a modified ISO, then to find just follow the same step by step.
Very good.
Note 10 only for not making a fool tutorial 20 minutes on youtube that guy is writing wrong in Notepad. And obg.
vdd
Very good friend, you were very happy in this tutorial, Congratulations!
It helped, thank you!